OpenStack all-in-one development server.
- Get a good server with a fair amount of CPU and RAM. This also depends on the number of instances you plan to run on it. For a basic minimum, you need at least 1 vyos, 1 controller and 1 compute … You might be able to get away with 8 or 16 gb of RAM, but you will not be able to run full tests. I recommend at least 32 gb of RAM. The more the merrier.
- You can also buy servers on ebay/auction and use them. A single network card is enough.
- Or contact me and I can arrange something for you ?? A ready-made test/dev infrastructure \o/
- generate a ssh key (without password) which you add later to the instances to login automatically
- add your own ssh key for you to login to this server
- disable password authentication
- install necessary software
apt-get install tcpdump qemu-kvm vlan htop iotop nginx bridge-utils lxc vim mc mosh virt-manager curl git
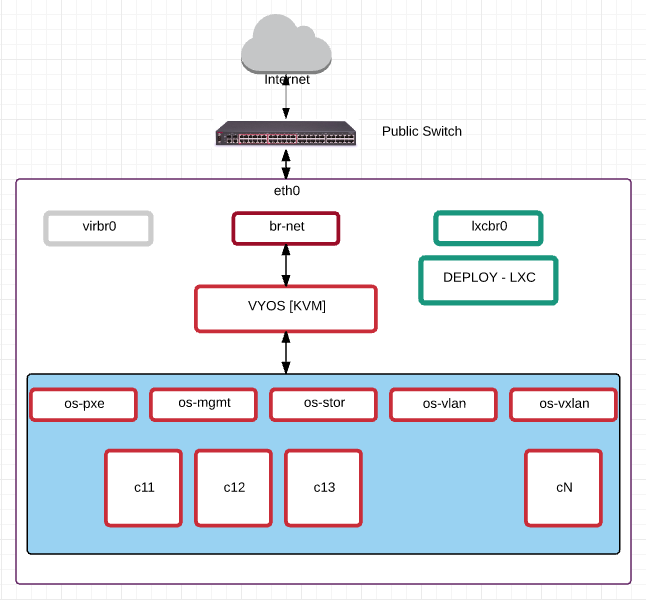
you will see the bridges virbr0 and lxcbr0
brctl show
bridge name	bridge id		STP enabled	interfaces
lxcbr0		8000.000000000000	no
virbr0		8000.000000000000	yes
ifconfig
em1       Link encap:Ethernet  HWaddr f0:1f:af:e3:5e:b4
          inet addr:1.1.1.10  Bcast:1.1.1.255  Mask:255.255.255.0
          UP BROADCAST RUNNING MULTICAST  MTU:1500  Metric:1
          RX packets:87852 errors:0 dropped:0 overruns:0 frame:0
          TX packets:9158 errors:0 dropped:0 overruns:0 carrier:0
          collisions:0 txqueuelen:1000
          RX bytes:77901847 (77.9 MB)  TX bytes:1167417 (1.1 MB)
          Interrupt:16

lo        Link encap:Local Loopback
          inet addr:127.0.0.1  Mask:255.0.0.0
          inet6 addr: ::1/128 Scope:Host
          UP LOOPBACK RUNNING  MTU:65536  Metric:1
          RX packets:18 errors:0 dropped:0 overruns:0 frame:0
          TX packets:18 errors:0 dropped:0 overruns:0 carrier:0
          collisions:0 txqueuelen:0
          RX bytes:1640 (1.6 KB)  TX bytes:1640 (1.6 KB)

lxcbr0    Link encap:Ethernet  HWaddr 4a:e5:53:21:90:56
          inet addr:10.0.3.1  Bcast:10.0.3.255  Mask:255.255.255.0
          inet6 addr: fe80::48e5:53ff:fe21:9056/64 Scope:Link
          UP BROADCAST RUNNING MULTICAST  MTU:1500  Metric:1
          RX packets:0 errors:0 dropped:0 overruns:0 frame:0
          TX packets:8 errors:0 dropped:0 overruns:0 carrier:0
          collisions:0 txqueuelen:0
          RX bytes:0 (0.0 B)  TX bytes:648 (648.0 B)

virbr0    Link encap:Ethernet  HWaddr a6:66:74:4d:9f:38
          inet addr:192.168.122.1  Bcast:192.168.122.255  Mask:255.255.255.0
          UP BROADCAST MULTICAST  MTU:1500  Metric:1
          RX packets:0 errors:0 dropped:0 overruns:0 frame:0
          TX packets:0 errors:0 dropped:0 overruns:0 carrier:0
          collisions:0 txqueuelen:0
          RX bytes:0 (0.0 B)  TX bytes:0 (0.0 B)
Great .. Now lets create the br-net
Your /etc/network/interfaces will look something like this
# This file describes the network interfaces available on your system
# and how to activate them. For more information, see interfaces(5).

# The loopback network interface
auto lo
iface lo inet loopback

# The primary network interface
auto em1
iface em1 inet static
	address 1.1.1.10
	netmask 255.255.255.0
	network 1.1.1.0
	broadcast 1.1.1.255
	gateway 1.1.1.1
	# dns-* options are implemented by the resolvconf package, if installed
	dns-nameservers 8.8.8.8
Change it to
## DO NOT BLINDLY COPY THIS FILE AND SAVE
## REPLACE 1.1.1.x IP with your correct IPs

auto lo
iface lo inet loopback

auto em1
iface em1 inet manual

auto br-net
iface br-net inet static
	address 1.1.1.10
	netmask 255.255.255.0
	network 1.1.1.0
	broadcast 1.1.1.255
	gateway 1.1.1.1
	# dns-* options are implemented by the resolvconf package, if installed
	dns-nameservers 8.8.8.8
	bridge_ports em1
to active the bridge, do
ifup br-net
brctl show
bridge name    bridge id        STP enabled    interfaces
br-net        8000.f01fafe35eb4    no        em1
lxcbr0        8000.000000000000    no
virbr0        8000.000000000000    yes
Now lets define the bridges to be used for openstack
Create the following files ( in your current directory )
pxe.xml
<network>
 <ip address="10.11.12.2" netmask="255.255.252.0">
 </ip>
  <name>pxe</name>
  <bridge name='os-pxe' stp='on' delay='0' />
</network>
mgmt.xml
<network>
 <ip address="172.29.236.2" netmask="255.255.252.0">
 </ip>
  <name>mgmt</name>
  <bridge name='os-mgmt' stp='on' delay='0' />
</network>
stor.xml
<network>
 <ip address="172.29.244.2" netmask="255.255.252.0">
 </ip>
  <name>stor</name>
  <bridge name='os-stor' stp='on' delay='0' />
</network>
vlan.xml
<network>
  <name>vlan</name>
  <bridge name='os-vlan' stp='on' delay='0' />
</network>
vxlan.xml
<network>
 <ip address="172.29.240.2" netmask="255.255.252.0">
 </ip>
  <name>vxlan</name>
  <bridge name='os-vxlan' stp='on' delay='0' />
</network>
active the networks
virsh net-define pxe.xml
virsh net-define mgmt.xml
virsh net-define stor.xml
virsh net-define vlan.xml
virsh net-define vxlan.xml
set the networks to auto-start
virsh net-autostart pxe
virsh net-autostart mgmt
virsh net-autostart stor
virsh net-autostart vlan
virsh net-autostart vxlan
start the networks
virsh net-start pxe
virsh net-start mgmt
virsh net-start stor
virsh net-start vlan
virsh net-start vxlan
virsh net-list –all
 Name                 State      Autostart     Persistent
----------------------------------------------------------
 default              active     yes           yes
 mgmt                 active     yes           yes
 pxe                  active     yes           yes
 stor                 active     yes           yes
 vlan                 active     yes           yes
 vxlan                active     yes           yes
brctl show
bridge name     bridge id               STP enabled     interfaces
br-net          8000.f01fafe35eb4       no              em1
lxcbr0          8000.000000000000       no
os-mgmt         8000.52540061507e       yes             os-mgmt-nic
os-pxe          8000.525400f92943       yes             os-pxe-nic
os-stor         8000.525400bc35bf       yes             os-stor-nic
os-vlan         8000.525400c36cf2       yes             os-vlan-nic
os-vxlan        8000.525400a90d2e       yes             os-vxlan-nic
virbr0          8000.000000000000       yes
Now setup VYOS using vnc or virt-manager
Assign the VYOS to the following bridges respectively
- eth0 => br-net
- eth1 => os-pxe
- eth2 => os-mgmt
- eth3 => os-stor
- eth4 => os-vlan
- eth5 => os-vxlan
Sample Vyos Config
## Sashi Dahal
## For context and background, please visit: https://www.openstackfaq.com/openstack-liberty-private-cloud-howto/
##
## These are actual VYOS commands


## setup your gateway
set system gateway-address '1.1.1.1'

## setup your public IP addresses

set interfaces ethernet eth0 address '1.1.1.2/24'
set interfaces ethernet eth0 address '1.1.1.3/24'

## this is the pxe/dhcp default gateway address
set interfaces ethernet eth1 address '10.11.12.1/22'

## openstack-ansible  management ip range
set interfaces ethernet eth2 address '172.29.236.1/22'

## openstack-ansible storage ip range
set interfaces ethernet eth3 address '172.29.244.1/22'

## floating-ip VLANs and IP range
set interfaces ethernet eth4 vif 101 address '192.168.101.1/24'
set interfaces ethernet eth4 vif 102 address '192.168.102.1/24'


## direct attached/dhcp  VLANs and IP range
set interfaces ethernet eth4 vif 201 address '192.168.201.1/24'
set interfaces ethernet eth4 vif 202 address '192.168.202.1/24'


## openstack-ansible vxlan ip range
set interfaces ethernet eth5 address '172.29.240.1/22'


## 1:1 NAT between internal and public IP
set nat destination rule 11 destination address '1.1.1.3'
set nat destination rule 11 inbound-interface 'eth0'
set nat destination rule 11 translation address '10.11.12.3'
set nat source rule 11 outbound-interface 'eth0'
set nat source rule 11 source address '10.11.12.3'
set nat source rule 11 translation address '1.1.1.3'

# NAT for the pxe range
set nat source rule 100 outbound-interface 'eth0'
set nat source rule 100 protocol 'all'
set nat source rule 100 source address '10.11.12.0/22'
set nat source rule 100 translation address 'masquerade'

# NAT for the floating-ip range
set nat source rule 101 outbound-interface 'eth0'
set nat source rule 101 protocol 'all'
set nat source rule 101 source address '192.168.101.0/24'
set nat source rule 101 translation address 'masquerade'

# NAT for the direct-attached-dhcp ip range
set nat source rule 201 outbound-interface 'eth0'
set nat source rule 201 protocol 'all'
set nat source rule 201 source address '192.168.201.0/24'
set nat source rule 201 translation address 'masquerade'

# VYOS acts as a DHCP server for the initial boot
set service dhcp-server disabled 'false'
set service dhcp-server shared-network-name pxe-pool authoritative 'disable'
set service dhcp-server shared-network-name pxe-pool subnet 10.11.12.0/22 default-router '10.11.12.1'
set service dhcp-server shared-network-name pxe-pool subnet 10.11.12.0/22 dns-server '10.11.12.1'
set service dhcp-server shared-network-name pxe-pool subnet 10.11.12.0/22 lease '86400'
set service dhcp-server shared-network-name pxe-pool subnet 10.11.12.0/22 start 10.11.12.11 stop '10.11.12.99'

set service dhcp-server shared-network-name pxe-pool subnet 10.11.12.0/22 static-mapping c11 ip-address '10.11.12.11'
set service dhcp-server shared-network-name pxe-pool subnet 10.11.12.0/22 static-mapping c11 mac-address '52:54:00:11:12:11'
set service dhcp-server shared-network-name pxe-pool subnet 10.11.12.0/22 static-mapping c12 ip-address '10.11.12.12'
set service dhcp-server shared-network-name pxe-pool subnet 10.11.12.0/22 static-mapping c12 mac-address '52:54:00:11:12:12'
set service dhcp-server shared-network-name pxe-pool subnet 10.11.12.0/22 static-mapping c13 ip-address '10.11.12.13'
set service dhcp-server shared-network-name pxe-pool subnet 10.11.12.0/22 static-mapping c13 mac-address '52:54:00:11:12:13'
set service dhcp-server shared-network-name pxe-pool subnet 10.11.12.0/22 static-mapping c14 ip-address '10.11.12.14'
set service dhcp-server shared-network-name pxe-pool subnet 10.11.12.0/22 static-mapping c14 mac-address '52:54:00:11:12:14'
set service dhcp-server shared-network-name pxe-pool subnet 10.11.12.0/22 static-mapping c15 ip-address '10.11.12.15'
set service dhcp-server shared-network-name pxe-pool subnet 10.11.12.0/22 static-mapping c15 mac-address '52:54:00:11:12:15'
set service dhcp-server shared-network-name pxe-pool subnet 10.11.12.0/22 static-mapping c16 ip-address '10.11.12.16'
set service dhcp-server shared-network-name pxe-pool subnet 10.11.12.0/22 static-mapping c16 mac-address '52:54:00:11:12:16'
set service dhcp-server shared-network-name pxe-pool subnet 10.11.12.0/22 static-mapping c17 ip-address '10.11.12.17'
set service dhcp-server shared-network-name pxe-pool subnet 10.11.12.0/22 static-mapping c17 mac-address '52:54:00:11:12:17'
set service dhcp-server shared-network-name pxe-pool subnet 10.11.12.0/22 static-mapping c18 ip-address '10.11.12.18'
set service dhcp-server shared-network-name pxe-pool subnet 10.11.12.0/22 static-mapping c18 mac-address '52:54:00:11:12:18'
set service dhcp-server shared-network-name pxe-pool subnet 10.11.12.0/22 static-mapping c19 ip-address '10.11.12.19'
set service dhcp-server shared-network-name pxe-pool subnet 10.11.12.0/22 static-mapping c19 mac-address '52:54:00:11:12:19'
set service dhcp-server shared-network-name pxe-pool subnet 10.11.12.0/22 static-mapping c20 ip-address '10.11.12.20'
set service dhcp-server shared-network-name pxe-pool subnet 10.11.12.0/22 static-mapping c20 mac-address '52:54:00:11:12:20'


# VYOS also acts as a DNS server ..
set service dns forwarding listen-on 'eth1'
set service dns forwarding name-server '8.8.8.8'
set service dns forwarding name-server '8.8.4.4'

set service ssh port '22'
Setup nginx for making installations local
apt-get install nginx
cd /usr/share/nginx/html
wget http://releases.ubuntu.com/14.04.4/ubuntu-14.04.4-server-amd64.iso
mkdir iso
mount -o loop ubuntu-14.04.4-server-amd64.iso iso
cp -a iso ubuntu
umount iso
rm -rf iso
test if things are working
curl -I http://10.11.12.2/ubuntu/install/filesystem.squashfs
HTTP/1.1 200 OK
Server: nginx/1.4.6 (Ubuntu)
Date: Sun, 13 Mar 2016 00:17:53 GMT
Content-Type: application/octet-stream
Content-Length: 68243456
Last-Modified: Wed, 17 Feb 2016 23:17:40 GMT
Connection: keep-alive
ETag: "56c4ff94-4115000"
Accept-Ranges: bytes
I create 80GB volumes for my test. In your case, you might use files.
lvscan
  ACTIVE            '/dev/cloud/c11' [80.00 GiB] inherit
  ACTIVE            '/dev/cloud/c12' [80.00 GiB] inherit
  ACTIVE            '/dev/cloud/c13' [80.00 GiB] inherit
  ACTIVE            '/dev/cloud/c14' [80.00 GiB] inherit
  ACTIVE            '/dev/cloud/c15' [80.00 GiB] inherit
  ACTIVE            '/dev/cloud/c16' [80.00 GiB] inherit
  ACTIVE            '/dev/cloud/c17' [80.00 GiB] inherit
  ACTIVE            '/dev/cloud/c18' [80.00 GiB] inherit
  ACTIVE            '/dev/cloud/c19' [80.00 GiB] inherit
  ACTIVE            '/dev/cloud/c20' [80.00 GiB] inherit
create /usr/share/nginx/html/ksUbuntu.txt kickstart file
Make sure you copy your ssh keys for yourself, this dev server and deploy-lxc container in there
# Ubuntu Auto Install KickStart File
# Shashi Dahal
#

lang en_US
langsupport en_US
keyboard us
timezone Europe/Amsterdam
rootpw admin0.#
user admin0 --fullname "admin0" --password admin0.$
auth  --useshadow  --enablemd5

text
install
network --bootproto=dhcp
url --url http://10.11.12.2/ubuntu/
reboot

bootloader --location=mbr
zerombr yes
clearpart --all --initlabel


part /boot --fstype ext4 --size 250 --asprimary
part pv.01 --size=1 --grow --asprimary
volgroup cloud pv.01
logvol swap --fstype swap --vgname=cloud --size=2048   --name=swap

## i create 3 extra volumes, so that the same could be used to test swift, ceph etc

logvol /disk1 --fstype ext4 --vgname=cloud --size=2048 --name=disk1
logvol /disk2 --fstype ext4 --vgname=cloud --size=2048 --name=disk2
logvol /disk3 --fstype ext4 --vgname=cloud --size=2048 --name=disk3
logvol /    --fstype ext4 --vgname=cloud --size=20480  --name=root --grow

preseed partman-lvm/confirm_nooverwrite         boolean true
preseed partman-auto-lvm/no_boot                boolean true
preseed base-installer/install-recommends       boolean false

d-i live-installer/net-image string http://10.11.12.2/ubuntu/install/filesystem.squashfs


firewall --disabled
skipx

%packages

%post

mkdir /root/.ssh/
cat << EOF >> /root/.ssh/authorized_keys
ssh-rsa shashi@
ssh-rsa root@cloud
ssh-rsa root@deploy
EOF

cat << EOF > /etc/apt/sources.list
deb http://nl.archive.ubuntu.com/ubuntu/ trusty main restricted
deb-src http://nl.archive.ubuntu.com/ubuntu/ trusty main restricted
deb http://nl.archive.ubuntu.com/ubuntu/ trusty-updates main restricted
deb-src http://nl.archive.ubuntu.com/ubuntu/ trusty-updates main restricted
deb http://nl.archive.ubuntu.com/ubuntu/ trusty universe
deb-src http://nl.archive.ubuntu.com/ubuntu/ trusty universe
deb http://nl.archive.ubuntu.com/ubuntu/ trusty-updates universe
deb-src http://nl.archive.ubuntu.com/ubuntu/ trusty-updates universe
deb http://nl.archive.ubuntu.com/ubuntu/ trusty multiverse
deb-src http://nl.archive.ubuntu.com/ubuntu/ trusty multiverse
deb http://nl.archive.ubuntu.com/ubuntu/ trusty-updates multiverse
deb-src http://nl.archive.ubuntu.com/ubuntu/ trusty-updates multiverse
deb http://nl.archive.ubuntu.com/ubuntu/ trusty-backports main restricted universe multiverse
deb-src http://nl.archive.ubuntu.com/ubuntu/ trusty-backports main restricted universe multiverse
deb http://security.ubuntu.com/ubuntu trusty-security main restricted
deb-src http://security.ubuntu.com/ubuntu trusty-security main restricted
deb http://security.ubuntu.com/ubuntu trusty-security universe
deb-src http://security.ubuntu.com/ubuntu trusty-security universe
deb http://security.ubuntu.com/ubuntu trusty-security multiverse
deb-src http://security.ubuntu.com/ubuntu trusty-security multiverse
EOF

apt-get update
apt-get install -y openssh-server curl vim tcpdump wget lvm2 htop lldpd python curl bridge-utils vlan ifenslave lsof ntp ntpdate sudo
apt-get -qq -y autoremove
apt-get clean
update-initramfs -u -v -k all
change the number of hosts you want to create in this loop
create recreate.sh file
#!/bin/bash
## Sashi Dahal
## For context and background, please visit: https://www.openstackfaq.com/openstack-liberty-private-cloud-howto/
##
## change loop based on what resources you have ..

for i in {11..20}
do
echo "removing c$i .. "
virsh destroy c${i}
sleep 5s
virsh undefine c${i}
sleep 5s

echo "creating c$i .."

virt-install \
--name c${i} \
--ram 4096 \
--disk path=/dev/cloud/c${i} \
--vcpus 4 \
--os-type linux \
--os-variant=ubuntutrusty \
--mac 52:54:00:11:12:${i} \
--network bridge='os-pxe' --network bridge='os-mgmt' --network bridge='os-stor' --network bridge='os-vlan' --network bridge='os-v
xlan' \
--graphics none --console pty,target_type=serial \
--location 'http://nl.archive.ubuntu.com/ubuntu/dists/trusty/main/installer-amd64/' \
--extra-args 'live-installer/net-image=http://10.11.12.2/ubuntu/install/filesystem.squashfs ks=http://10.11.12.2/ksUbuntu.txt ksd
evice=bootif biosdevname=0 nosplash nomodeset console=ttyS0,115200n8 serial' \
--noautoconsole
sleep 60s
done
if you run recreate.sh, it will now create new VMS everytime .. keeping the IPs the same for you that start with 10.11.12.x ..
Lets create the deploy server
apt-get install lxc
lxc-create -t download -n deploy -- --dist ubuntu --release trusty --arch amd64
lxc-ls -f
lxc-start -n deploy -d
login to the deploy server
lxc-attach -n deploy
from the deploy server, you should now be able to ping all these ips:
- 10.11.12.1 , 10.11.12.2
- 172.29.236.1 , 172.29.236.2
- 172.29.240.1 , 172.29.240.2
- 172.29.244.1 , 172.29.244.2
Add this to your /etc/hosts of the deploy server
10.11.12.11 c11x
10.11.12.12 c12x
10.11.12.13 c13x
10.11.12.14 c14x
10.11.12.15 c15x
10.11.12.16 c16x
10.11.12.17 c17x
10.11.12.18 c18x
10.11.12.19 c19x
10.11.12.20 c20x

172.29.236.11 c11
172.29.236.12 c12
172.29.236.13 c13
172.29.236.14 c14
172.29.236.15 c15
172.29.236.16 c16
172.29.236.17 c17
172.29.236.18 c18
172.29.236.19 c19
172.29.236.20 c20
If you created any VMS using the recreate.sh script, they might be in shut-off state after installation is done
you just need to do virsh start c11 ; virsh start c12 etc
if everything is properly done, you should now be able to ping them using ping c11x c12x etc
add this to your /root/.ssh/config
host c*
   StrictHostKeyChecking no
   UserKnownHostsFile=/dev/null
Now lets create the hostname template file
create file called hostname_loop
#!/bin/bash
# Shashi Dahal

hostname HOST
echo HOST  > /etc/hostname
perl -pi -e 's/kickseed/HOST/g' /etc/hosts
create another file called interfaces_loop
# Network
auto lo
iface lo inet loopback

auto eth0
iface eth0 inet dhcp

auto eth1
iface eth1 inet manual

auto eth2
iface eth2 inet manual

auto eth3
iface eth3 inet manual

auto eth4
iface eth4 inet manual

auto br-mgmt
iface br-mgmt inet static
 bridge_stp off
 bridge_waitport 0
 bridge_fd 0
 bridge_ports eth1
 address 172.29.236.IPADDR
 netmask 255.255.252.0

auto br-vxlan
iface br-vxlan inet static
 bridge_stp off
 bridge_waitport 0
 bridge_fd 0
 bridge_ports eth4
 address 172.29.240.IPADDR
 netmask 255.255.252.0

auto br-storage
iface br-storage inet static
 bridge_stp off
 bridge_waitport 0
 bridge_fd 0
 bridge_ports eth2
 address 172.29.244.IPADDR
 netmask 255.255.252.0


auto br-vlan
iface br-vlan inet manual
 bridge_stp off
 bridge_waitport 0
 bridge_fd 0
 bridge_ports eth3
Now lets play with some loops
for i in {11..20}; do cat hostname_loop | sed "s/HOST/c$i/g" > hostname.$i; done
for i in {11..20}; do cat interfaces_loop | sed "s/IPADDR/$i/g" > interfaces.$i; done
you will have files like hostname.11 and interfaces.11 in your folder
assuming that all your VMS are up, lets copy over the files
more loops:
for i in {11..17}; do scp hostname.$i c${i}x:/root/hostname.sh; done
for i in {11..20}; do scp interfaces.$i c${i}x:/etc/network/interfaces; done
login to a few to check if all is fine, and then activate them
for i in {11..20}; do ssh c${i}x bash /root/hostname.sh; ssh c${i}x reboot; done
and wait for all to reboot.
After they are up, from the deploy server, you should be able to ping them as ping c11 and ssh directly like ssh c11 ..
With this, you get re-usable infrastructure all the time.